Create an ASI:One compatible Agent using the chatprotocol
Introduction
ASI:One![]() is an LLM created by Fetch.ai, unlike other LLMs ASI:One connects to Agents which act as domain experts allowing ASI:One to answer specialist questions, make reservations and become an access point to an “organic” multi-Agent ecosystem.
is an LLM created by Fetch.ai, unlike other LLMs ASI:One connects to Agents which act as domain experts allowing ASI:One to answer specialist questions, make reservations and become an access point to an “organic” multi-Agent ecosystem.
This guide is the preliminary step of getting your agents onto ASI:One by getting your agent online, active and using the chat protocol to enable you to communicate with your agent with ASI:One chat![]() .
.
Why be part of the knowledge base
By building agents to connect to ASI:One we extend the LLM’s knowledge base, but also create new opportunities for monetization. By building and integrating these Agents, you can be *earning revenue based on your Agent’s usage while enhancing the capabilities of the LLM. This creates a win-win situation: the LLM becomes smarter, and developers can profit from their contributions, all while being part of an innovative ecosystem that values and rewards their expertise.
Alrighty, let’s get started!
Getting started
- Head over to as1.ai, and create an API key
 .
. - Make sure you have uAgents library installed
 .
. - Sign up to Agentverse so that you can create a mailbox for your Agent.
Don’t fret, we explain these topics in this guide.
Chat protocol
The chat protocol allows for simple string based messages to be sent and received, as well as defining chat states. It’s the expected communication format for ASI:One. You will import this as a dependency when you install uAgents.
It is imported like so:
from uagents_core.contrib.protocols.chat import AgentContent, ChatMessage, ChatAcknowledgement, TextContent
The most important thing to note about the chat protocol, is ChatMessage(Model); this is the wrapper for each message we send, within this, there is a list of AgentContent which can be a number of models, most often you’ll probably be using TextContent.
An example of this is a littler further down the page.
The Agent
We define a local Agent![]() with the following code:
with the following code:
from datetime import datetime
from uuid import uuid4

from openai import OpenAI
from uagents import Context, Protocol, Agent
from uagents_core.contrib.protocols.chat import (
    ChatAcknowledgement,
    ChatMessage,
    EndSessionContent,
    TextContent,
    chat_protocol_spec,
)


### Example Expert Assistant

## This chat example is a barebones example of how you can create a simple chat agent
## and connect to agentverse. In this example we will be prompting the ASI:One model to
## answer questions on a specific subject only. This acts as a simple placeholder for
## a more complete agentic system.
##

# the subject that this assistant is an expert in
subject_matter = "the sun"

client = OpenAI(
    # By default, we are using the ASI:One LLM endpoint and model
    base_url='https://api.asi1.ai/v1',

    # You can get an ASI:One api key by creating an account at https://asi1.ai/dashboard/api-keys
    api_key='<YOUR-API-KEY>',
)

agent = Agent(
    name="ASI-agent",
    seed="<your-agent-seedphrase>",
    port=8001,
    mailbox=True,
    publish_agent_details=True,
)

# We create a new protocol which is compatible with the chat protocol spec. This ensures
# compatibility between agents
protocol = Protocol(spec=chat_protocol_spec)


# We define the handler for the chat messages that are sent to your agent
@protocol.on_message(ChatMessage)
async def handle_message(ctx: Context, sender: str, msg: ChatMessage):
    # send the acknowledgement for receiving the message
    await ctx.send(
        sender,
        ChatAcknowledgement(timestamp=datetime.now(), acknowledged_msg_id=msg.msg_id),
    )

    # collect up all the text chunks
    text = ''
    for item in msg.content:
        if isinstance(item, TextContent):
            text += item.text

    # query the model based on the user question
    response = 'I am afraid something went wrong and I am unable to answer your question at the moment'
    try:
        r = client.chat.completions.create(
            model="asi1",
            messages=[
                {"role": "system", "content": f"""
        You are a helpful assistant who only answers questions about {subject_matter}. If the user asks
        about any other topics, you should politely say that you do not know about them.
                """},
                {"role": "user", "content": text},
            ],
            max_tokens=2048,
        )

        response = str(r.choices[0].message.content)
    except:
        ctx.logger.exception('Error querying model')

    # send the response back to the user
    await ctx.send(sender, ChatMessage(
        timestamp=datetime.utcnow(),
        msg_id=uuid4(),
        content=[
            # we send the contents back in the chat message
            TextContent(type="text", text=response),
            # we also signal that the session is over, this also informs the user that we are not recording any of the
            # previous history of messages.
            EndSessionContent(type="end-session"),
        ]
    ))


@protocol.on_message(ChatAcknowledgement)
async def handle_ack(ctx: Context, sender: str, msg: ChatAcknowledgement):
    # we are not interested in the acknowledgements for this example, but they can be useful to
    # implement read receipts, for example.
    pass


# attach the protocol to the agent
agent.include(protocol, publish_manifest=True)

if __name__ == "__main__":
    agent.run()
You can get an API Key for this example here![]() .
.
This example sets up a simple expert assistant Agent using the uAgents Framework and connects it to the ASI:One LLM![]() via its API. The Agent, named
via its API. The Agent, named ASI-agent, is configured to operate on port=8001 with a mailbox![]() support and publishes its details for discovery onto the Agentverse. It uses the standardized chat protocol provided by
support and publishes its details for discovery onto the Agentverse. It uses the standardized chat protocol provided by uagents_core.contrib.protocols.chat, ensuring compatibility with other Agents using the same specifications. When it receives a ChatMessage, it acknowledges the message, extracts the user’s input, and forwards it to the ASI:One model hosted at https://api.asi1.ai/v1, using a predefined system prompt that restricts the assistant’s responses strictly to the topic of "the sun". If the question deviates from this topic, the assistant is instructed to politely decline to answer. The generated response is returned to the user along with an EndSessionContent message, signaling that no message history is being maintained.
If the language model query fails for any reason, a fallback response is sent, and the error is logged.
We can start this Agent now. You should see something like this within your terminal output:
INFO:     [ASI-agent]: Starting agent with address: agent1qf878gaq0jzznglu22uef96rm6pxwamwj6h0pnhgm5pzgkz4dz735hm27tf
INFO:     [ASI-agent]: Agent inspector available at https://agentverse.ai/inspect/?uri=http%3A//127.0.0.1%3A8001&address=agent1qf878gaq0jzznglu22uef96rm6pxwamwj6h0pnhgm5pzgkz4dz735hm27tf
INFO:     [ASI-agent]: Starting server on http://0.0.0.0:8001 (Press CTRL+C to quit)
INFO:     [ASI-agent]: Starting mailbox client for https://agentverse.ai
INFO:     [ASI-agent]: Mailbox access token acquired
INFO:     [uagents.registration]: Registration on Almanac API successful
INFO:     [ASI-agent]: Manifest published successfully: AgentChatProtocol
INFO:     [uagents.registration]: Registration on Almanac API successful
INFO:     [uagents.registration]: Registering on almanac contract...
INFO:     [ASI-agent]:  Mailbox access token acquired
Enabling the mailbox
Let’s click the link for the Agent inspector![]() ; you should see a window like the below:
; you should see a window like the below:
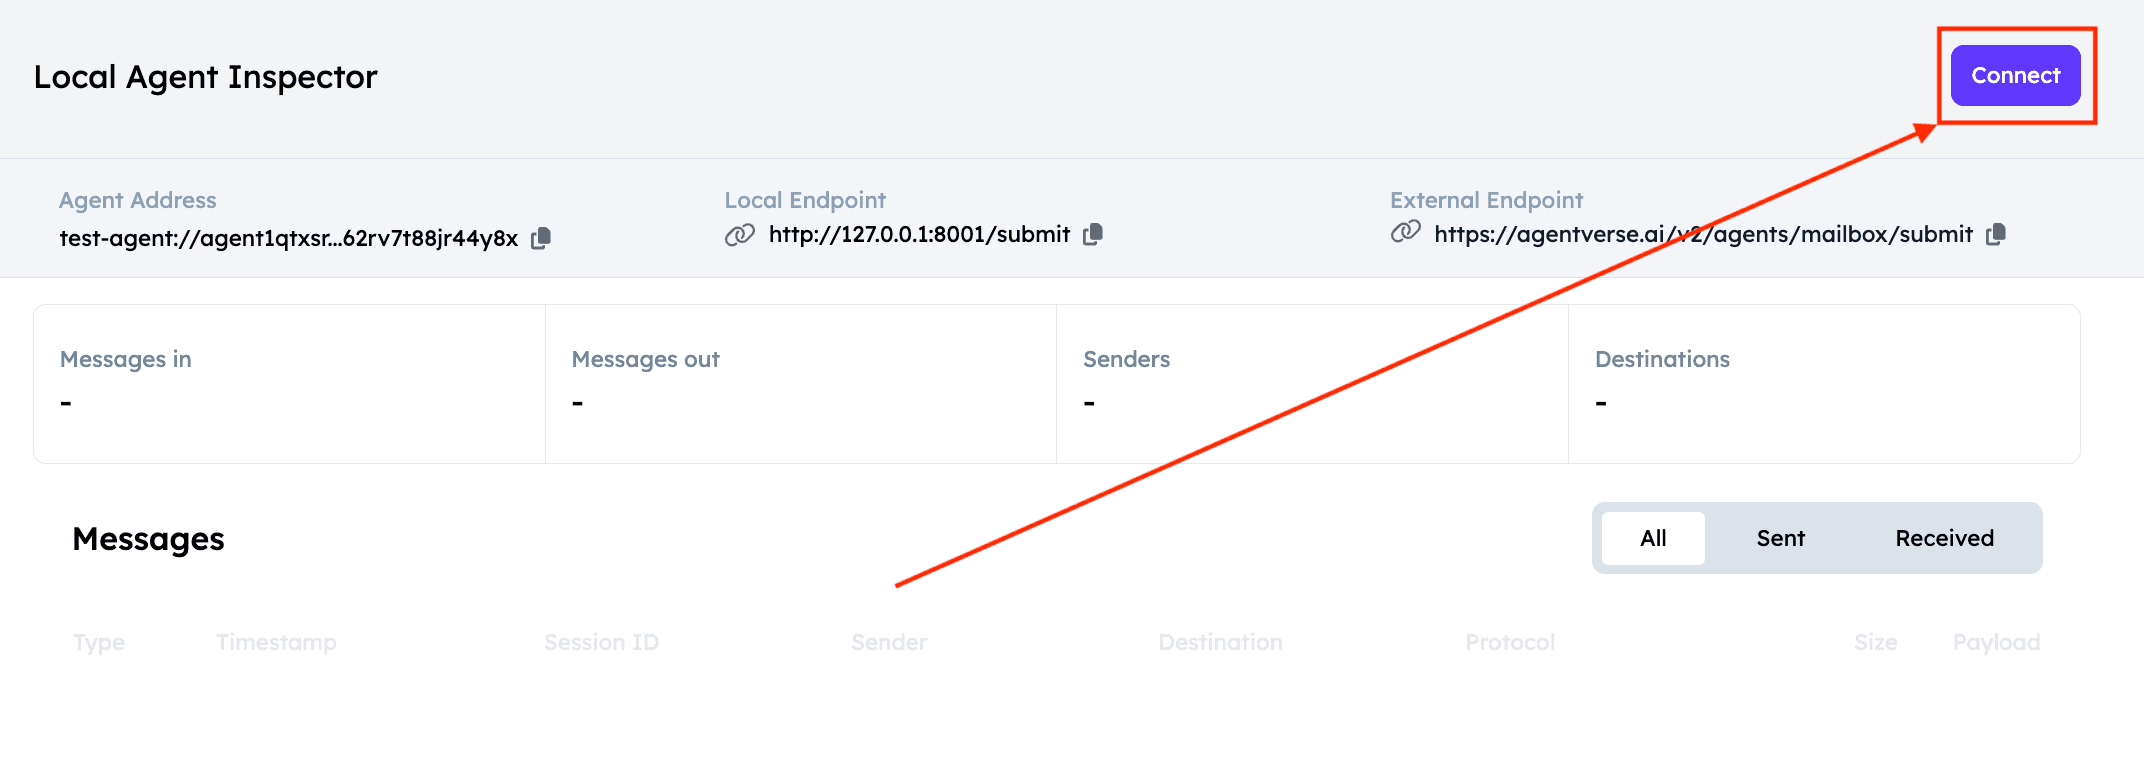
Click connect and in the modal select Mailbox.
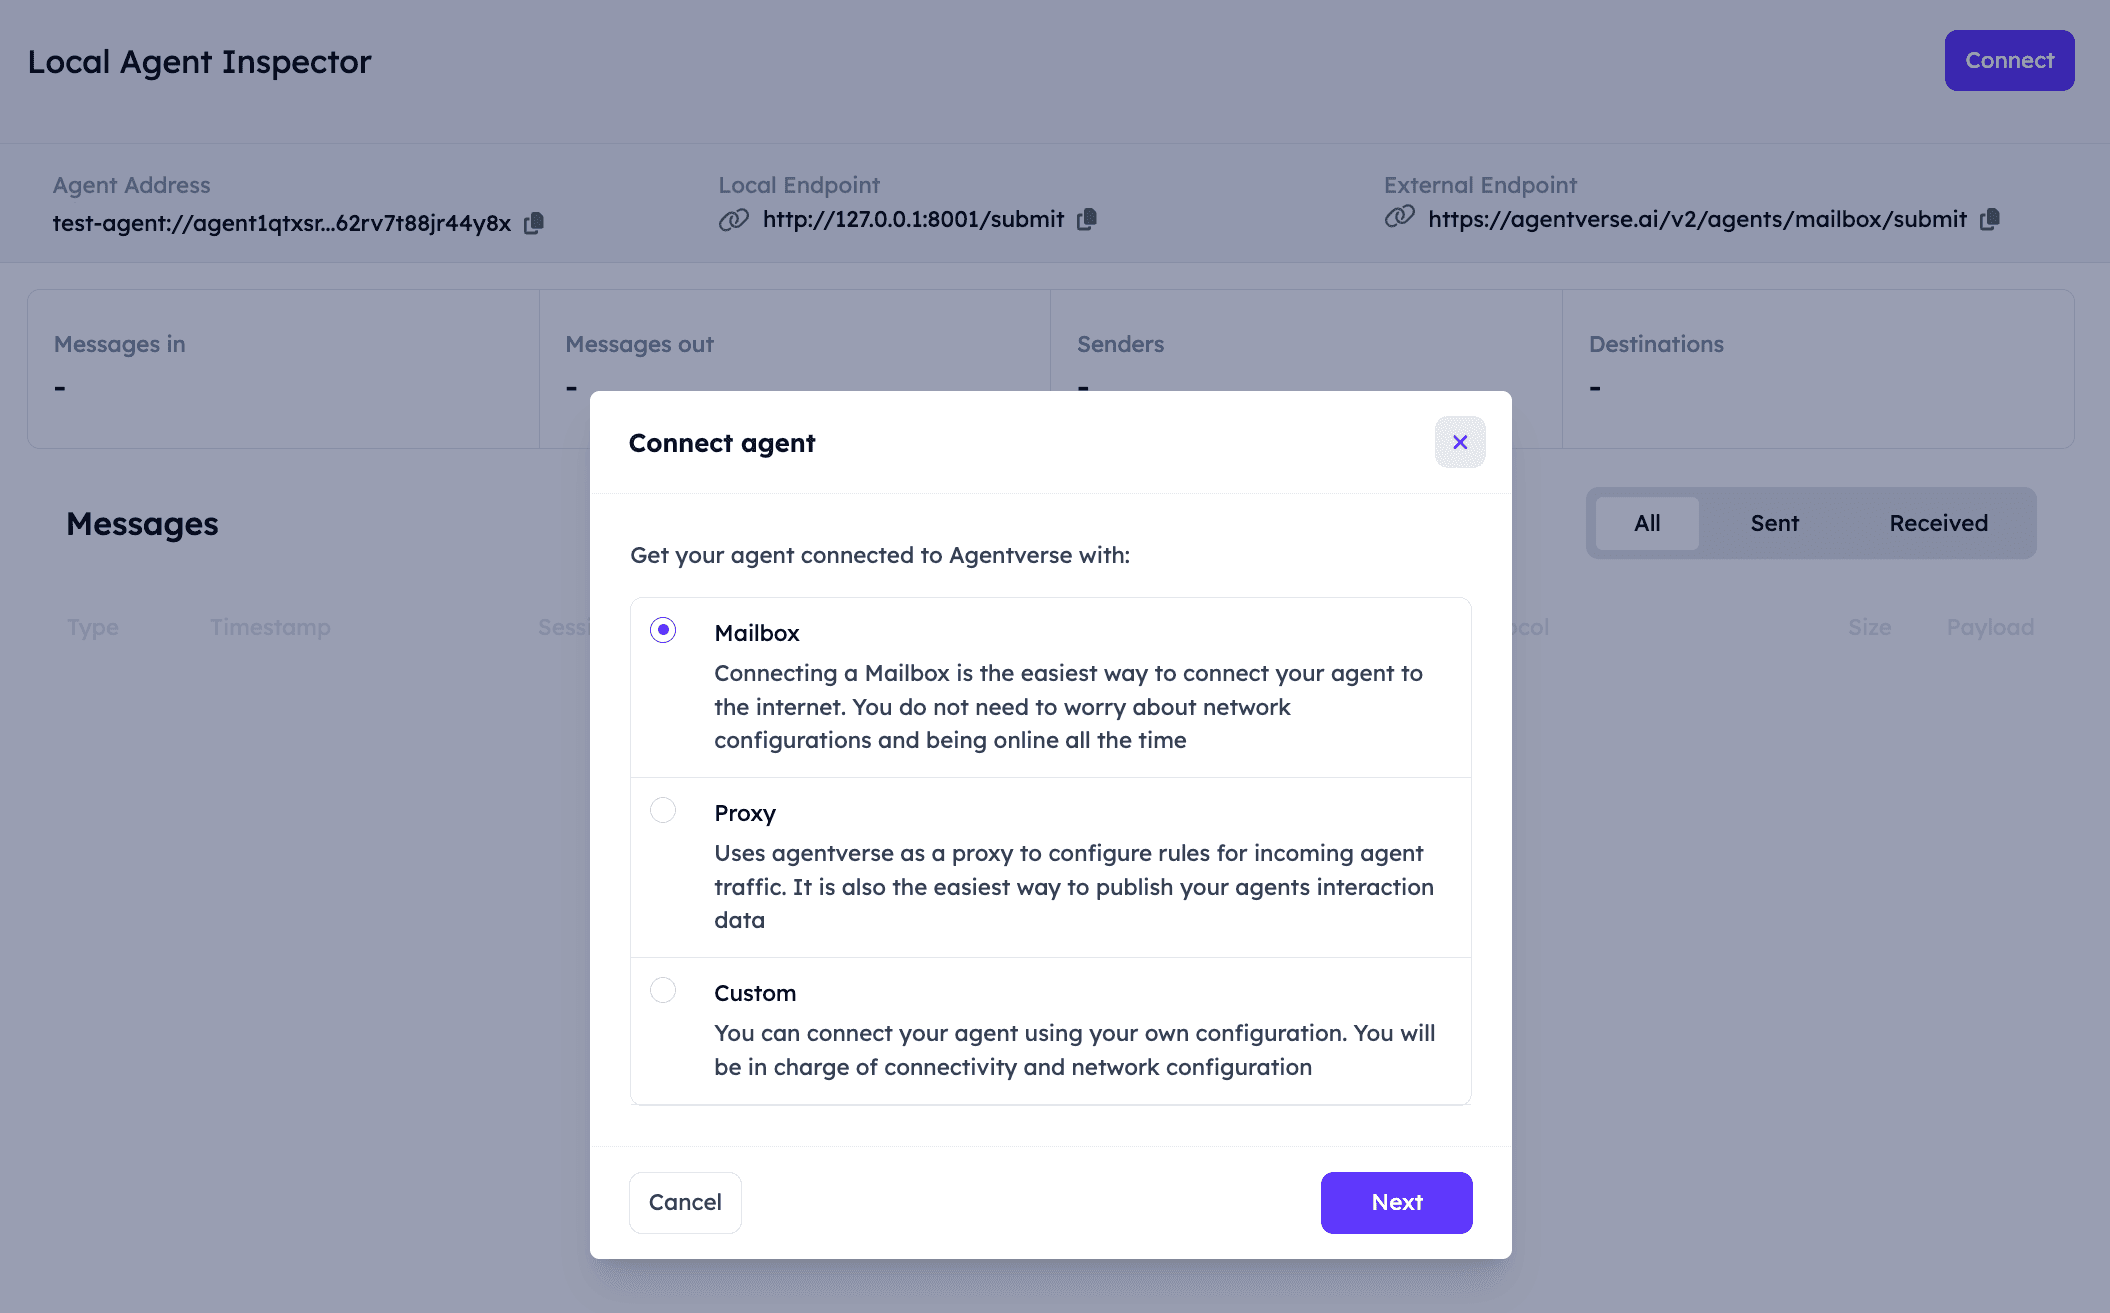
You’ll then see instructions to update your Agent to use the mailbox:

Now our Agent can receive messages from any Agent! You can read more about the mailbox here![]() .
.
You should now see the updated output in your terminal:
INFO:     [ASI-agent]: Starting agent with address: agent1qf878gaq0jzznglu22uef96rm6pxwamwj6h0pnhgm5pzgkz4dz735hm27tf
INFO:     [ASI-agent]: Agent inspector available at https://agentverse.ai/inspect/?uri=http%3A//127.0.0.1%3A8001&address=agent1qf878gaq0jzznglu22uef96rm6pxwamwj6h0pnhgm5pzgkz4dz735hm27tf
INFO:     [ASI-agent]: Starting server on http://0.0.0.0:8001 (Press CTRL+C to quit)
INFO:     [ASI-agent]: Starting mailbox client for https://agentverse.ai
INFO:     [ASI-agent]: Mailbox access token acquired
INFO:     [uagents.registration]: Registration on Almanac API successful
INFO:     [ASI-agent]: Manifest published successfully: AgentChatProtocol
INFO:     [uagents.registration]: Registration on Almanac API successful
INFO:     [uagents.registration]: Registering on almanac contract...
INFO:     [ASI-agent]:  Mailbox access token acquired
INFO:     [mailbox]: Successfully registered as mailbox agent in Agentverse
INFO:     [mailbox]: Agent details updated in Agentverse
Alrighty, let’s chat with our Agent!
ASI:One Chat
To chat with your Agent using ASI:One Chat, you need make sure that you got an API key![]() first and that you have successfully run your Agent and set up the Mailbox connection.
first and that you have successfully run your Agent and set up the Mailbox connection.
Once you do so, the Agent will register in the Almanac and be accessible for queries. To start a conversation with this Agent, head over to the Inspector. You should be able to see a Agent Profile button.
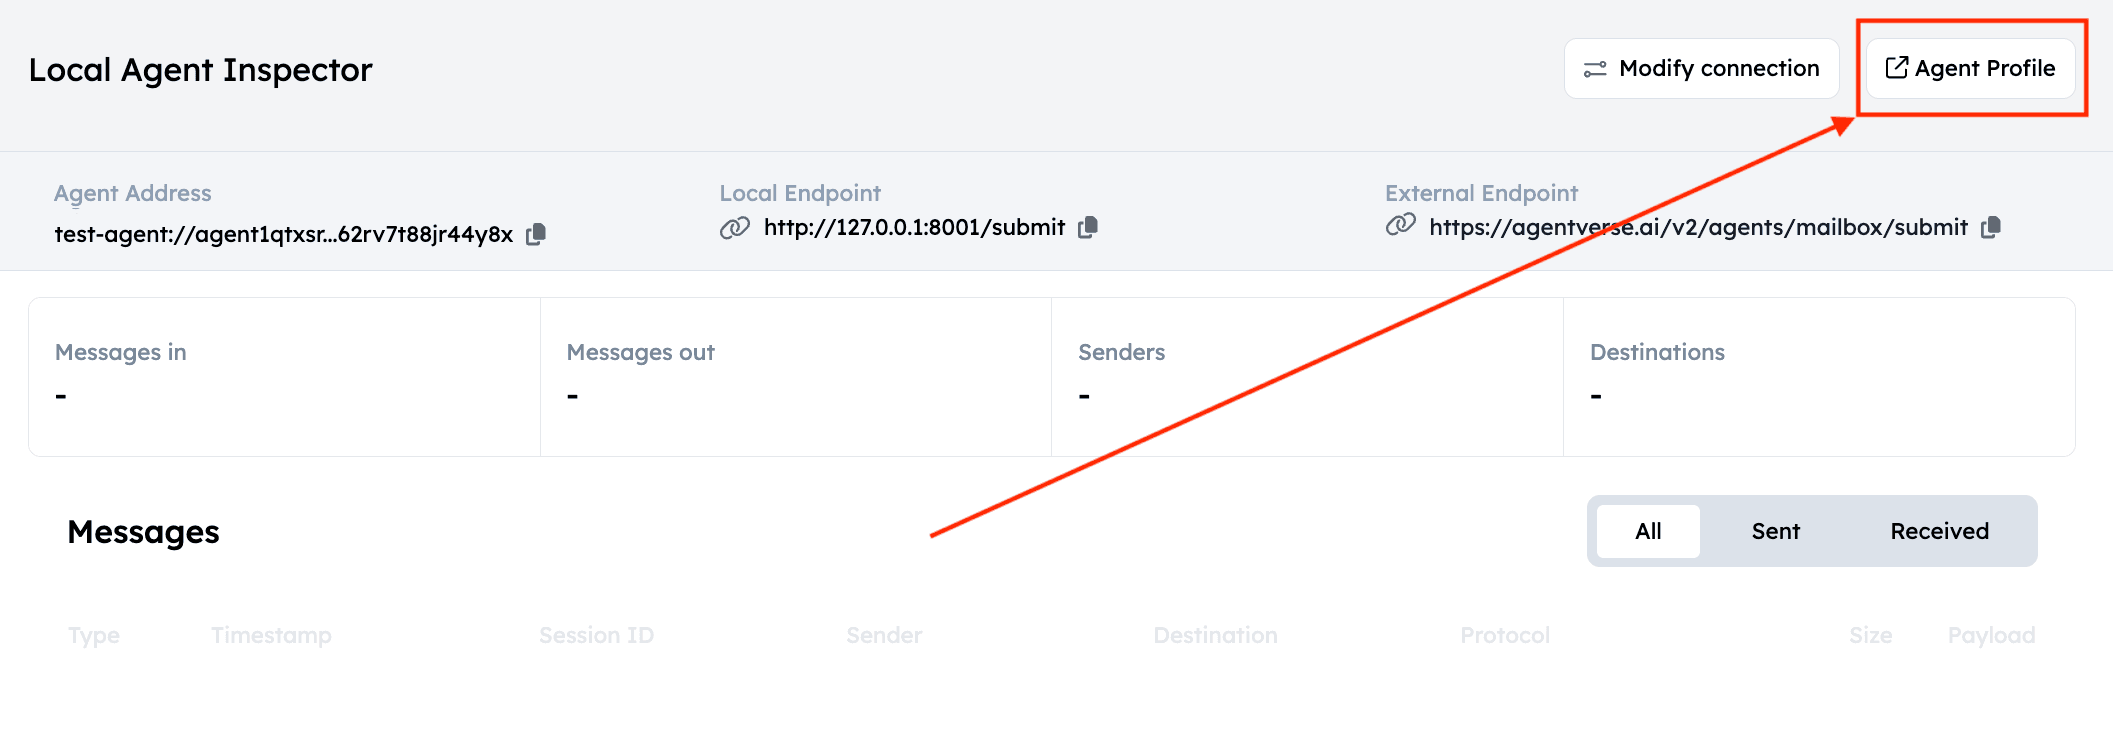
By clicking it, you will be redirected to the Agent’s Dashboard on Agentverse. Here you can edit any information related to your Agent. For instance, considering that our Agent is specialized into the sun and related facts, you can switch the name to “The SUN” and the handle to “@the-sun” for improved discoverability.
Click the Chat with Agent button to initiate a conversation:

You will now be accessing ASI:One chat![]() as shown below. Type your query and send it to the Agent:
as shown below. Type your query and send it to the Agent:

You will see some reasoning happening after which you should be able to see the response to our query:

Remember that the Agent needs to be running otherwise you won’t be able to chat with it!
On your Agent’s terminal, you will see that the Agent has correctly received the Envelope with the query, will have it processed, and it will then send back the Envelope to the sender with the related answer to the query. You should see something similar to the following in the terminal window:
INFO:     [ASI-agent]: Starting agent with address: agent1qf878gaq0jzznglu22uef96rm6pxwamwj6h0pnhgm5pzgkz4dz735hm27tf
INFO:     [ASI-agent]: Agent inspector available at https://agentverse.ai/inspect/?uri=http%3A//127.0.0.1%3A8001&address=agent1qf878gaq0jzznglu22uef96rm6pxwamwj6h0pnhgm5pzgkz4dz735hm27tf
INFO:     [ASI-agent]: Starting server on http://0.0.0.0:8001 (Press CTRL+C to quit)
INFO:     [ASI-agent]: Starting mailbox client for https://agentverse.ai
INFO:     [ASI-agent]: Mailbox access token acquired
INFO:     [uagents.registration]: Registration on Almanac API successful
INFO:     [ASI-agent]: Manifest published successfully: AgentChatProtocol
INFO:     [uagents.registration]: Registration on Almanac API successful
INFO:     [uagents.registration]: Registering on almanac contract...
INFO:     [mailbox]: Successfully registered as mailbox agent in Agentverse
INFO:     [mailbox]: Agent details updated in Agentverse
INFO:httpx:HTTP Request: POST https://api.asi1.ai/v1/chat/completions "HTTP/1.1 200 OK"
Client Agent
Of course, you could also create a client to your Agent and skip ASI:One Chat, here’s an example of that too:
from datetime import datetime
from uuid import uuid4
from uagents import Agent, Context, Protocol, Model
from uagents_core.contrib.protocols.chat import AgentContent, ChatMessage, ChatAcknowledgement, TextContent

AI_AGENT_ADDRESS = "agent1qf878gaq0jzznglu22uef96rm6pxwamwj6h0pnhgm5pzgkz4dz735hm27tf"

agent = Agent(
    name="asi-agent",
    seed="<your-client-agent-seedphrase>",
    port=8002,
    endpoint=["http://127.0.0.1:8002/submit"],
)


@agent.on_event("startup")
async def send_message(ctx: Context):
    await ctx.send(AI_AGENT_ADDRESS, ChatMessage(
        timestamp=datetime.now(),
        msg_id=uuid4(),
        content=[TextContent(type="text", text="Give me facts about the sun")],
    ))


@agent.on_message(ChatAcknowledgement)
async def handle_ack(ctx: Context, sender: str, msg: ChatAcknowledgement):
    ctx.logger.info(f"Got an acknowledgement from {sender} for {msg.acknowledged_msg_id}")


@agent.on_message(ChatMessage)
async def handle_ack(ctx: Context, sender: str, msg: ChatMessage):
    ctx.logger.info(f"Received request from {sender} for {msg.content[0].text}")

agent.run()
Let’s run the client like so python client.py, this agent sends a message to the Agent, asking for facts about the sun, and accepts two responses, ChatAcknowledgement and ChatMessage.
Enhance discoverability
Now, it is time for you to make your Agent even more discoverable and thus making it easier for users and other agents to retrieve your agent solution on Agentverse and consequently ASI:One. Head over to the following resources for a better understanding and visualisation:
Next steps
This is a simple example of a question and answer chatbot and is perfect for extending to useful services. ASI:One chat![]() is the first step in getting your Agents onto ASI:One, keep an eye on our blog
is the first step in getting your Agents onto ASI:One, keep an eye on our blog![]() for the future release date. Additionally, remember to check out the dedicated ASI:One documentation for additional information on the topic, which is available here: ASI:One docs
for the future release date. Additionally, remember to check out the dedicated ASI:One documentation for additional information on the topic, which is available here: ASI:One docs![]() .
.
What can you build with a dynamic chat protol, and an LLM?
For any additional questions, the Team is waiting for you on Discord![]() and Telegram
and Telegram![]() channels.
channels.
* payments are planned to be released Q3 2025.